|
Last Updated: Oct 29th, 2004 - 03:55:13 |
SoftPlan has excellent tools for creating roof rafters. But what if you want to build sloped ceiling rafters under the roof so you can represent it in renderings and SoftList? The challenge is building sloped ceiling joists. Additionally it is difficult to build a roof within a roof. Here is a method for using the roof functions to do a sloped ceiling.
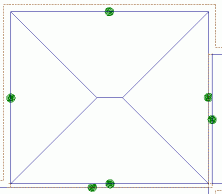
First of all, build your roof as you normally would. Place all your rafters and make any necessary adjustments. Switch over to Ceiling mode and draw in your ceiling by selecting Draw-->Ceiling and tracing around the room. This produces a flat ceiling. For this lesson we will want to build a ceiling that slopes up on all four sides and then flattens out. To do this we will need to give the ceiling a pitch. Select Edit and click somewhere in the middle of the ceiling. Set the pitch to whatever you want, say 8". This will give you a ceiling that looks like a hipped roof.
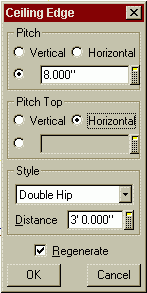
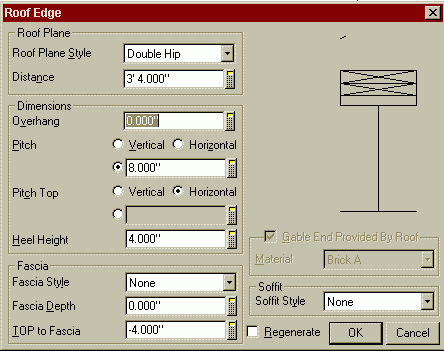
Next select one of the edges of the ceiling and change the Style from Hip to Double Hip. Set the pitch to 8", the Pitch Top to Horizontal and the Distance to 3'.
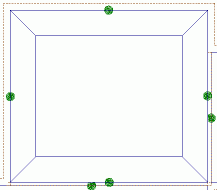
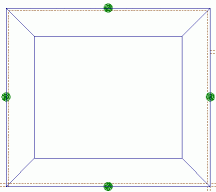
What do these settings do? The Double Hip Style setting tells SoftPlan that you want your ceiling to slope up at a certain pitch for a certain distance and then the pitch changes. In this case we have the first Pitch set at 8". This gives us an initial pitch from the top of the wall plates of 8". The distance setting tells SoftPlan how far we want this pitch to be in effect. In this case it is 3'. The distance is measured horizontally from the inside of the wall to the point where the pitch change takes place. Pitch Top tells SoftPlan that when you reach the Distance (3') that you want the pitch to change to the new pitch entered. In this case it is Horizontal. Your ceiling now looks like this.
Here comes the tricky part. If you want 3d and if you are using SoftList, you need to draw your ceiling joists sloped to follow the pitch of the ceiling.
Save your drawing. Next select Save As and enter the name Sloped Ceiling. In your Sloped Ceiling drawing switch over to Roof mode. Use Type Erase to erase everything in your drawing other than the Walls and Beams. You will notice that the roof did not erase even though all the rafters are no longer there. Erase your roof so that all you have left are the walls and beams.
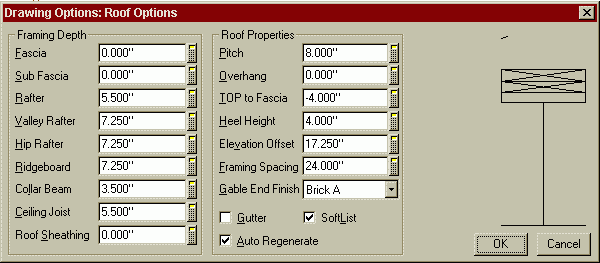
Select File-->Drawing Options-->Material Dimensions-->Roof Options. Make note of the heel height you used when you created your original roof. Change Fascia, Sub Fascia, Roof Sheathing, and overhang to 0". Change the Heel Height back to what it was before making these changes. For SoftList make sure that SoftList is checked.
Select Ok. Now we need to make our interior walls bearing so we can attach a roof to them. Select File-->Drawing Options-->Define Wall-->Edit. Select the name of your interior walls. In the Column labeled Bearing double click the box in the row for the Stud material. This makes the interior wall a bearing wall so you can attach a roof to it. Select OK to return to your drawing.
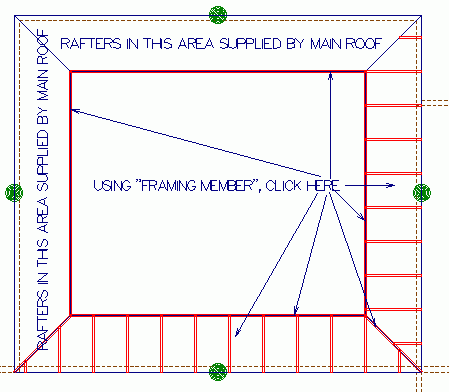
Now use Trace Roof to draw in a roof around your room. Edit one edge of the roof just like you did your ceiling above. This time you need to add 4", or whatever your wall width is, to the Distance measurement since the ceiling was on the inside of the wall but the roof is on the outside.
Your roof should now look like this:
Now use Framing Member to add in the rafters that will be used as ceiling joists on the sloped sections of the ceiling. Since some rafters will be supplied by the main roof we will not add them in again.
Now since we do not want to have SoftList count the roof sheathing for this room you need to click on the roof and remove the check mark from SoftList. Leave SoftList checked for all the rafters. Save the file.
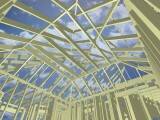
Next use Type Erase to erase the walls and beams. You should be left with just a roof and rafters in your drawing. Save the file. Now all that is left to do is to add this to your original drawing. Select File-->Merge and then select the name of your original file. This merges your original drawing file into the new file with the sloped ceiling rafters. Now save again using the name of the original drawing. You now have a ceiling with the sloped rafters in place. All that is left to do is to go into Ceiling mode and draw in your flat ceiling joists.
© Copyright 2004 by SPLASH
Top of Page