Creating Insulated Concrete Forms
and Dropped Floor systems
This article has been created from a very ingenious idea from Softplan user Brujenn
Otherwise known as Bruce Jennings
As a background to this some ICF builders like to frame their Floor systems by attaching a header/ledger with anchor bolts to the inside of the ICF form, this allows for a monolithic concrete wall the full height of the exterior wall using this forming method.
To begin we will need to create 3 separate walls in system options
- aabfound
- aabfloor
- aabmain
The First wall will be the ICF base which will require a footing and a bearing material on the outside of the wall and Drywall on the inside, you will also need to have the Dimension and Extension variable set to outside
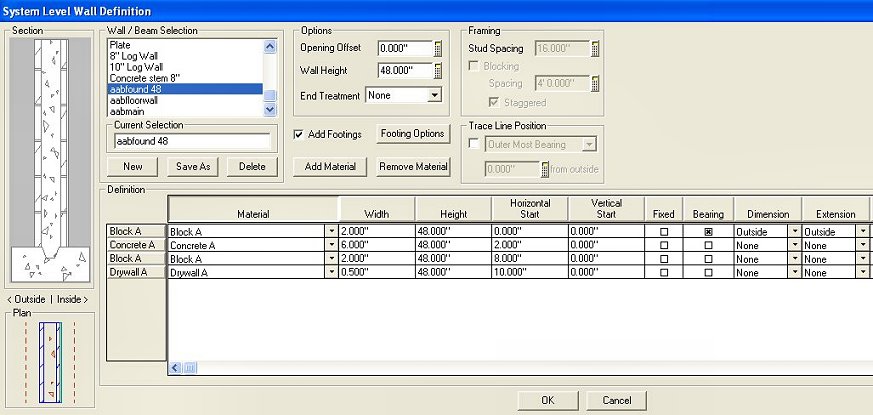 |
| dimensions may vary from block to block |
The Second wall and the brainchild of the ICF floor wall, this wall will be the same height of the floor system you will be using (you will edit this wall to your floor height until you place your floor then edit it to .125" )
Eg 11.875� Joist
.75� Subfloor
= 12.625� Floor wall height
Instead of drywall, this wall will have the �None material� on the inside checked for bearing and 0� thick and requires no footing when created , you will also need to have the Dimension and Extension variable set to outside
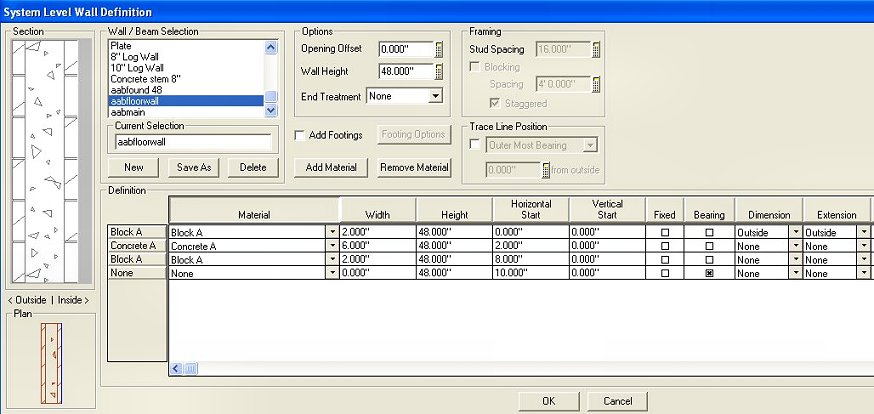 |
| dimensions may vary from block to block |
The third wall is the ICF main wall and will have a plate at the Top of the wall that will be marked bearing and Fixed and will also have Drywall on the inside , you will also need to have the Dimension and Extension variable set to outside
This wall mimicks the way you build on site as a plate is required for the Roof system
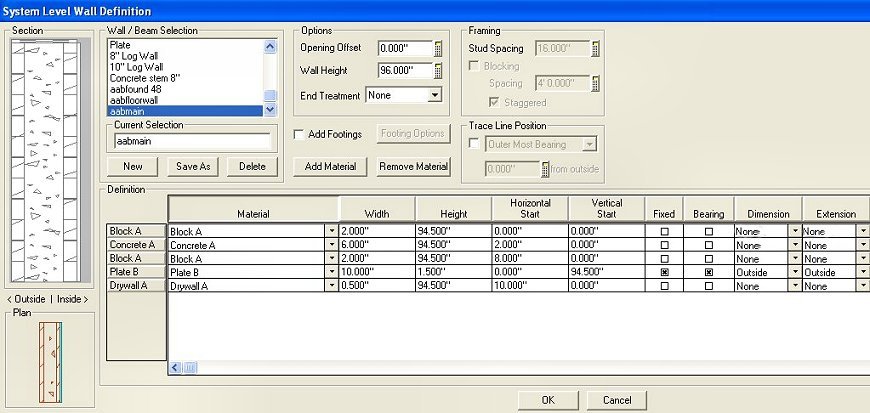 |
| dimensions may vary from block to block |
Begin by placing your aabfound wall and edit to the correct width and length and height required, for this example I used 4� hi wall , place a reference point in one corner save this drawing as icf foundation
Next use �save as� and save a copy called icf floorlayer and another drawing called icf mainwalls
Open the icf floorlayer drawing and use change wall to change the wall to �aabfloor� when the dialog box opens choose align the outside of current wall to outside of new wall
In Drawing Options decide on the floor system parameters . enter 11.875� for joist and .75� for sub floor
In this example we will use a total floor height of 12.625�
Edit your wall height to this now
The next step is to go to floor mode and place a floor system , remember to uncheck plate as we do not require this.
Note how your floor snaps to the inside of the wall
Go back to Drawing mode and edit a wall you will also notice that the wall height and offset are the same number this is because Sp has set the floor up by the floor height amount
You will need to edit the wall height to (.125 inches) to have your section cut correctly edit one and repeat for the rest of your walls
Save your file and then open the drawing ICF mainwalls
Here we will use change wall to change the aabfound wall to a aabmain wall. When the dialog box opens choose align the outside of current wall to outside of new wall
This will give us a wall that has no footing and has a top bearing plate
Save as icf mainwalls
Place a section line on the ICF foundation drawing and the assemble your floors
Your section should look like the one below
This ingenious idea can be used in other instances where dropped floors are required
