|
Last Updated: Oct 29th, 2004 - 03:55:13 |
In order to accomplish this task you will need to download Wcvt2pov (a utility which allows you to flip models on the xyz axis).
The following method is shown using this utility (other programs may differ). Create these two folders, mydocuments/dxfFiles and c:/softplan/3d/3dsymbols/mymodels.
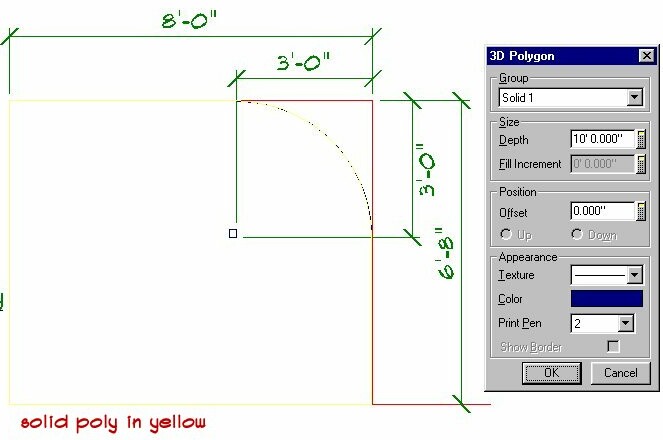
Step 1. Open a New Drawing and save it as Solarium.spd. Using tools from the shapes menu draw a box the size shown, then use an arc (scl works best) to approximate the curve of the solarium.
Step 2. Using this template for a guide use Draw-->Solid-->Polygon and trace around this shape. You can use cntr-a to get a free cursor for around the arc area. One should use short clicks around this area so it looks smooth, then continue around to complete the polygon.
Step 3. Once the polygon is complete use the edit button and change the depth to 10'. You have just created the glass enclosure of the solarium. Save the Solarium.spd file.
Step 4. Select Build-->Assemble Floors. Highlight Solarium and select Add then OK. Select Build-->3-Dimension-->Shaded and generate a 3D shaded view. From within SoftView Export the file to a DXF file by using File-->Export-->DXF. Name the file sol.dxf and save it in the mydocuments/dxfFiles folder. Remember to add the DXF extension to the file name. If you were to look at the generated model you would notice that it is in the wrong orientation (the model needs to be rotated -90 deg along the x-axis). This is where you require the dxf utility program wcvt2pov. If you haven't already done so, download it using the link above and load it on your system.
Step 5. Open the sol.dxf file in wcvt2pov and rotate the model -90 on the x axis.(rotate 90 deg if using crossroads) Use save as and save it in c:/softplan/3d/3dsymbols/mymodels (remember to add the dxf extention when naming your file). Call it solarium.dxf
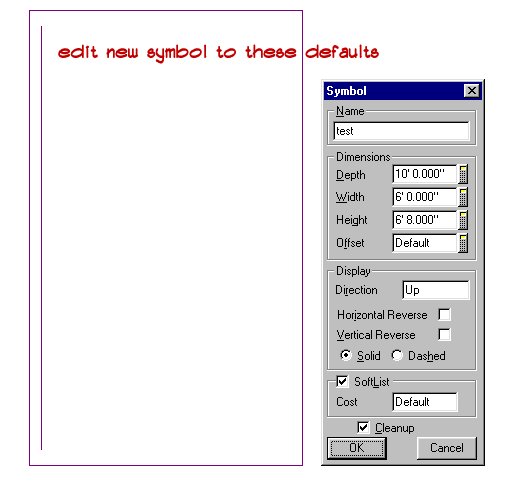
Step 6. Next we will add a 2d symbol and link it to the solarium.dxf file. First draw a box with a line as shown below using shapes. Explode it if you use a box (cntrl-e). Then use File-->Library-->Symbol-->Add Item. Use from - to and encircle the shape.
Add the symbol to Symbol 11 (or a library of your choice) and name it solarium and link it to solarium.dxf from mymodels, or whichever library you saved the model to. You should now be able to place this symbol from the Draw-->Symbols menu. (Note: The 3D Symbol selected below should be solarium.dxf rather than splash1.dxf.)
If you edit the solarium symbol it should have these defaults. (Note: the symbol name should read "solarium" rather than "test")
Step 7. Creating the Solarium Ribs. Reopen the solarium.spd drawing. Erase the first polygon we created. Using lines and an arc approximate the size and shape of the ribs by drawing additional lines and an arc outside the original lines and arc. I made mine 4" high.
As before, use Solid/Polygon to trace the shape. Zoom in close to make the task easier if necessary. Once you have completed the polygon edit it to be 3" deep.
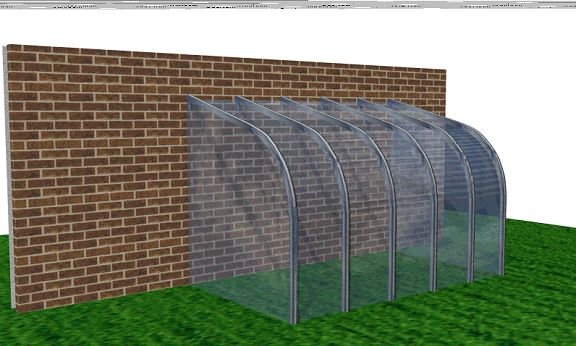
The next step is to copy the ribs a certain distance apart. The length of the solarium was 10' so decide how many ribs you want. I chose to have them 2' apart so I need to copy the rib 5 times. Copy the rib 2' apart. Next edit each of the ribs in turn and set the offsets as follows 0", 2'1.5", 4'1.5", 6'1.5", 8'1.5", 9'9". Then move each rib back on top of the first and save the file. You can generate a 3d shaded view of this as you did above and you will see that the ribs will be stacked on top of each other ( I used this graphic for clarity it is better to copy the rib at least 7' apart then they do not touch each other and are therefore easier to realign by using an exact distance)
After generating the 3d shaded view export it as dxf into mydocuments/dxf files. Call it ribs.dxf. You now follow Step 5 as previously mentioned to rotate this dxf.
When creating the 2d symbol for ribs, place the solarium glass symbol we created in a new drawing twice and explode one of them using cntrl-e. Go to File-->Library-->Symbol-->Add Item and encircle the symbol you just exploded. Name it to the the symbol 11 menu, call it ribs and link it to ribs.dxf.
The last thing we need to do is to move the ribs symbol on top of the solarium symbol then regenerate a 3d drawing. You will see the ribs on top of the glass now. Now the final step is to export this as a dxf then create a 2d symbol for the combined unit using the methods discussed previously ( Tip: place one of the previous symbols and explode it using it for the final 2d symbol.
You can download a zip file of this dxf at solarium.zip
© Copyright 2004 by SPLASH
Top of Page