|
From
SPLASH
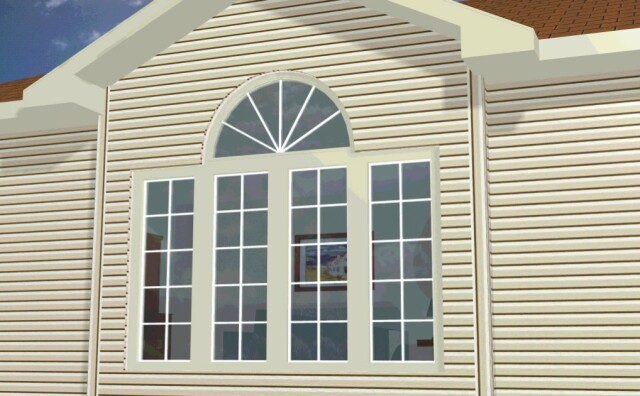
Rendering The ability to have objects that contain glass, such as windows, showers, glass tables, mirrors, etc. can be achieved by using the appropriate texture, and selecting the desired opacity and reflectivity settings for that texture. This example will walk you through how to create the glazing appearance as seen on the window here.
Create yourself a simple floor plan such as the one shown, and place a window on one of the exterior walls.
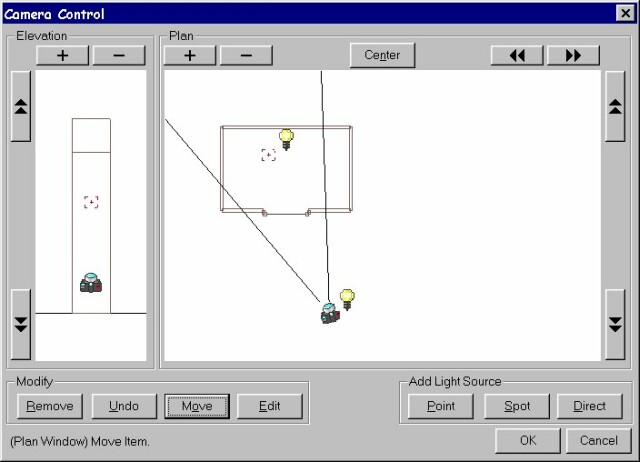
For my example I used all 8'-0" high walls, and placed a 8'x5' standard casement window, with a 28" offset down. There are 4 sections selected, and the option to show grills has been checked on this opening. Above the standard casement is a 1/2 round window, 4'x2'-2", with a 2" offset down. Place a flat ceiling in ceiling mode. In roof mode a hip roof was drawn, and the roof edge over the bump-out that contains the windows, is edited to be a gable edge. On this gable edge, uncheck the option "gable end provided by roof". In drawing mode the wall that the windows are placed in has been edited to "Fit Top of Wall to Roof" to allow the wall to fill in the gable end. Note: The offset of window openings are based from the top of the window, to the top of the wall it is drawn in. If the wall has Multiple heights (such as our wall in this example) the offset of the window will be based of the lowest of the multiple heights for that wall. Inside the house, place some furniture symbols in a location that they will be seen in 3-D while looking through the window. Now assemble the floor plan, and generate a visible line 3-D so we can position our camera, and select our materials before we render. Once in SoftView, select camera to open the camera control box. Position the camera in plan, and elevation view, and add point light source to enhance the exterior with shadows. Add a point light source to the interior that will cast shadows from the interior symbols, and enhance the wall/ceiling lines. Below is what the camera control box looks like for the image in this article.
We are now ready to apply a texture to the window. If you look closely at the glazing on the final image, you will see a reflection of clouds in the glass. This is not really a reflection, but rather the texture used for the glass is the cloud texture shipped with SoftPlan for use as a background. As SoftPlan rendered mode uses bitmaps (BMP files) for its images, the clouds.bmp file can be copied and used in other locations. The shipped cloud.bmp texture is not placed in the same folder as the other SoftView textures, you will have to copy it from its current location, into a folder that is accessible from the material dialog. I suggest using your windows explorer to copy and paste the clouds. The clouds.bmp file is located in the Softplan10\3D\Textures\Backgrounds folder. Copy it from there, and in the Softplan10\3D\Textures\Bitmaps folder are all the available material folders for SoftView. You can paste this clouds.bmp texture into one of the existing folders, or create your own folder to paste the clouds texture into. If you are not familiar with copy and pasting of files, or using windows explorer, you can use other existing textures already in SoftPlan, but will not have the clouds appearance in the glazing. In SoftView click on Material to open the Material Assignment menu. In the Type section, select "Openings". The Group section will become active, select "Glazing". In the lower portion of the Material Assignment dialog under Properties will be "Window". The display should be check on, The color will not matter, as we will apply a texture. Double click on the texture box to open the Texture menu.
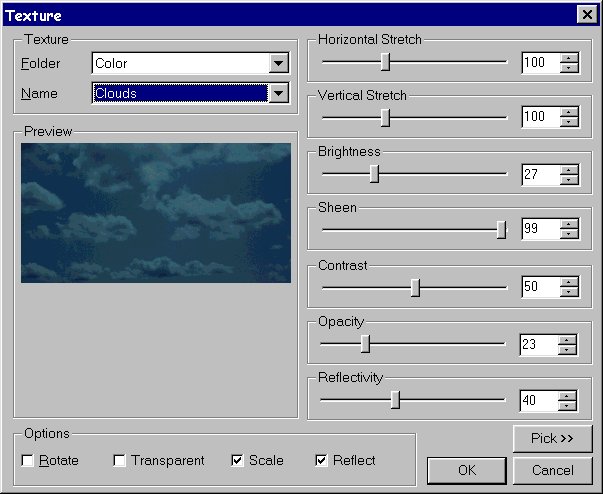
Pick the texture folder you placed the cloud bitmap in, and select the clouds under name. (if you are not using the clouds, select the color folder, and use a dark Grey). Reduce the Opacity slide bar to allow the cloud image to become see-through. The lower the opacity, the more transparent the texture. Check the reflect check box, and adjust the reflectivity slide bar. If there are no addition objects in the foreground to be reflected in the window, it will reflect black. The greater the reflectivity setting the darker the cloud image will display, making it appear tinted. Select OK on the texture menu, apply any other desired textures to other items in the material menu, and press OK. Change the mode from visible line to rendered, and select all the opening style line check in the extraction options box. Click on Options and select Render Options. In this menu check "textures", "shadows", and "reflections", and select the desired anti alias setting, and press OK. (remember the higher the anti alias, the shaper the angled lines on the rendering) Press the GO button to render the image. Due to different video settings, and how colors can appear on different PC's, you may have to adjust the opacity and reflectivity settings to achieve a desired shade. © Copyright 2004 by SPLASH http://www.softplansplash.org |