Adjusting Heel Heights in SoftPlan
By Grant McCombie (maccadd)
Feb 24, 2003
First of all download the heel height.doc from the Boneyard for Reference http://www.softplansplash.org/members/boneyard/download.cgi?id=480
You can correctly set the heel heights in Softplan to reflect the accurate Cross sections of roofs for both Hand framed roofs as well as Trusses
HANDFRAMED EXAMPLE #1
For this "Hand framed" example I will use a 2x10 Rafter and a 2x6 exterior wall and the roof has a 6/12 pitch and it is sitting on a 2x6 exterior wall.
Setup
In order for your cross sections to display correctly you first need to set the roof parameters to reflect the rafter width you are using, the pitch of roof and the heel height.
These can be set in "Drawing options > material dimensions > roof options
The pitch and heel height can be entered after the roof is generated by editing the individual roof, but it is important that the rafter size be set before generating the Framing in Softveiw
- Enter 9.5" for the rafter (2x10)
- Enter 6/12 for the pitch
- From table b in the heel height document line up 6/12pitch and 2x10 rafter enter 7.871" for the heel height
- Now you can proceed and generate an "auto stick frame"
- Go to the lowest floor in your plan and add a section line
- Make sure you have your floors assembled correctly then generate a section, then save as drawing
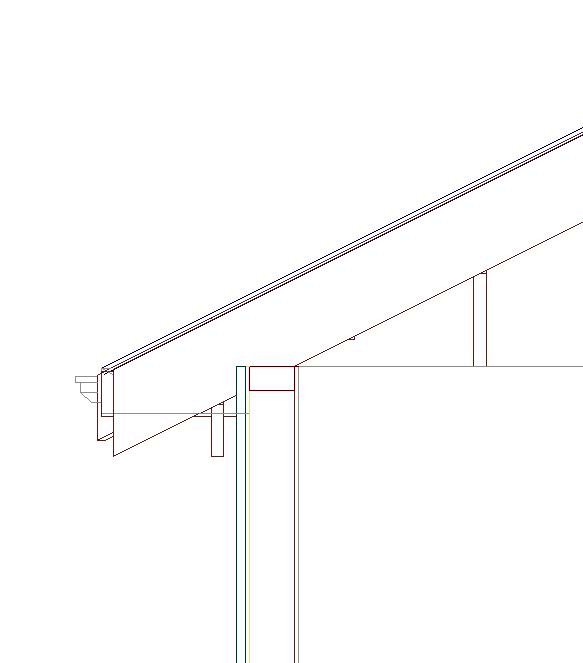
- You should have a section as below
HANDFRAMED EXAMPLE #2
- Rafter width 2x8 pitch 8/12 exterior wall 2x4
- Enter 7.5" in roof options under rafter
- Enter pitch as 8/12
- From table A line up colums to produce 6.680" as heel height
- Generate your roof then Framing
TRUSS ROOF EXAMPLE
Setup
In order for your cross sections to display correctly you first need to set the roof parameters to reflect the rafter width you are using, the pitch of roof and the heel height.
These can be set in "Drawing options > material dimensions > roof options
The pitch and heel height can be entered after the roof is generated by editing the individual roof, but it is important that the rafter size be set before generating the Framing in Soft view
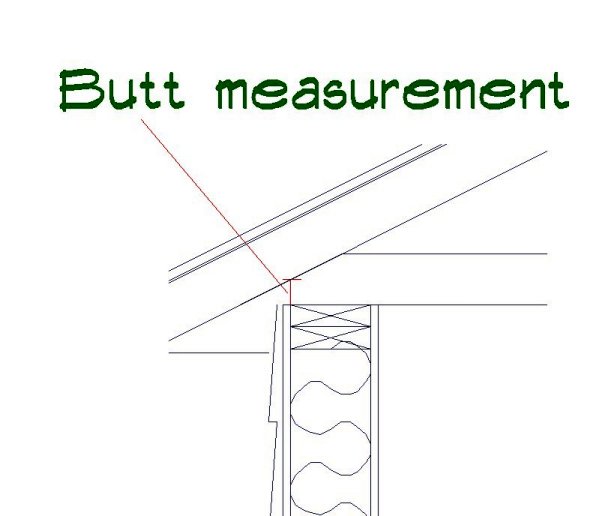
The "rafter size in this example represents the TOP CHORD of the truss you are using
The next definition I will refer to as "BUTT measurement"
It is the vertical measurement from the Top plate to the UNDERSIDE of the Top chord of the truss
- I will assume that the top chord of the truss is 2x4 and the pitch is 6/12 the wall is 2X6
- Look in the First table and find the plumb cut of a 2x4 at 6/12
- You will find it to be 3.913"
- Decide on your "Butt measurement" I used 1 3/4" (these will vary from region to region or specific truss type )
- Add 3.913" + 1.75" = 5.633" (this is your heel height)
- Edit the roof to reflect this and make sure your pitch is correct
- Generate a Truss section edit direction as required
- Generate a section as before
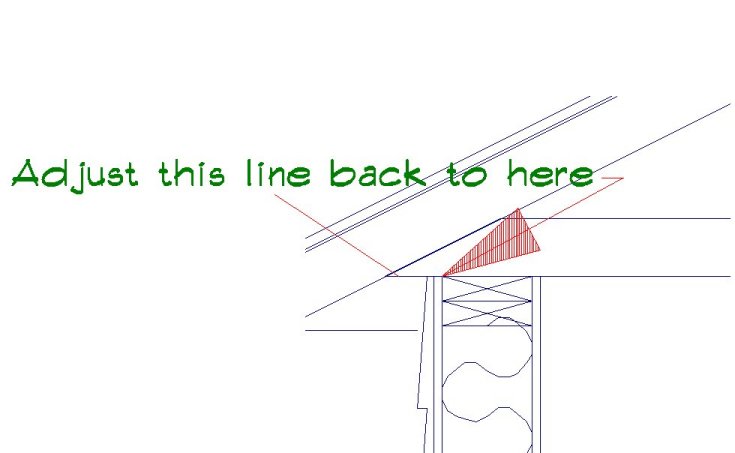
You will notice that when you cut the section there will be a point to the bottom chord of the truss going past the outside of the top plate if you trim this line to the plate the truss will be correct.
© Copyright 2004 by
SPLASH http://www.softplansplash.org